Monday, February 27

Fat Tuesday Cake (Fastlagskaka)


Tomorrow it's Fat Tuesday, the day everyone is filling their tummies with these yummy buns called the Fastlagsbulle (semla, laskiaispulla...). As usual I've already had a few and played around with the traditional version.

The traditional bun from last years post


 I just realised my Blog has just turned 1years (on the 9th of Feb) so Happy Belated Birthday to my dear Tales of a social eater blog :) YEEEY!!!
 I almost missed this but luckily these yummy buns were here to remind me, however, this year Fat Tuesday came later than last year. My first ever post was all about these sinfully delicious buns but this year I decided to try a different version. This version is great for a bigger group of people and also if you want you can cheat on the bun itself and get a ready made loaf like I did this time.


All you need is:
A bun loaf (I used Oululainen's Pullava) unless you want to make your own.
Almonds
Sugar
Milk
Cardamon
Vanilla paste
Pistachios


Slice the bun loaf horizontally to create layers for the cake.
Make the almond paste and spread onto each layer.
Whip the cream and add to each layer.
Top with some crushed almonds and pistachios.
I even sprinkled on some matcha powder.

Ready to be served. It's so easy and definitely a fun twist on the original bun. It's less messy to eat and everyone can take a slice the size they like.

Why not surprise everyone at the office with this delight :)

The Paste
150 g almond flour (or blanched almonds) 
150 g granulated sugar
approx. 4-5 tbsp milk or water
a drop of vanilla extract
cardamom seeds if you want to add extra cardamom flavour like I did.

Just mix the ingredients together in a mixer to make a smooth paste to your desired consistency. If you like a bit of crunch you can roast some almonds and chop them into the mixture.  In most shops (atleast here in Finland) you can find ready made almond paste....but even then I like to make it softer with milk...so I feel it's better to use almonds or almond flour.

If you want to make the traditional buns you can find the recipe here Fastlagsbulle


Friday, February 24

Superfood Salad


This is probably one of my all time favourite salads on a day when you really want to feel healthy. I've had this many years ago abroad and after that decided to try it at home. You can add and deduct some ingredients according to your liking but this is my version of Superfood Salad. I just love how colourful and pretty it is...not to forget how tasty it is. You could add dressing if you like but I prefer mine with just a squeeze of lime...this way you also don't take away any health and diet benefits from this. I eat this quite often and suggest you try it too.


Spinach 50g
Quinoa 1dl or 160g
Beetroot 100-150g
Butternut 100-150g
Pomegranate 50g
Soy Beans 50g
Green Peas 50g
Sunflower Seeds 20g
Sesame Seeds 1 tbsp
Pumpkin Seeds 20g
Alphalpha 20 g
Chili 1/2
Coriander 15g
Lime 1/2
Sometimes I also add in some other ingredients like: mint leaves (5-10g) and red onion or even half an avocado (this makes it more filling).

The only things that need cooking are the butternut, beetroot and quinoa. I used black quinoa and just cook it according to the instructions on the package.
The butternut you buy will most probably weigh more than needed for this salad but I always dice the whole butternut and roast it in the oven or sometimes I've even boiled it this way it's more vibrant but the taste is more bland. The rest can be used for roasted butternut in your breakfast yoghurt like in my recipe Roasted Butternut with Yoghurt and Dukkah or you can use it as a puree or for soups or just as a side dish for fish or meat.
The beetroots take a while to cook....so on days you don't have time I know you can buy ready cooked ones in Finland (but not the ones pickled in a glass jar...they taste different).
During the winter season I just use frozen peas and soy beans but when peas are in season make sure to use those.

To keep the salad colourful I recommend that you don't toss everything in
with the beetroot or everything will turn a bit pink. I just layer and sprinkle everything on top of the spinach.


                                   You have to admit, This really does look pretty and tempting!
SaveSave

Monday, February 20

Fast and Easy Thai Chicken Curry


When it's cold outside I often tend to want to eat soups or spicy stuff. Yesterday I couldn't decide on if to make Ramen or Thai coconut Chicken soup so I had bought ingredients that would go both ways. Since I had enjoyed Ramen yesterday it was time for some Thai food today. I made this really simple Thai curry that will be ready in a jiffy and would use up all my leftovers cause I really don't like to throw food away.
I even had the chicken ready from yesterday so this was faster than getting fast food. It's probably not the prettiest or most sophisticated of my curries but this is my fast version when you just want something in a rush and still be fulfilling.


2 cloves of garlic
1/2 - 1 chili
1 stalk of lemongrass
15g ginger
1 lime (zest and juice)
2 stalks of spring onion
5 mini patty pan courgettes (140g)
40g Haricot verts green beans
30g shitake mushrooms
400ml coconut milk
2tbsp fish sauce
2 chicken fillets

I even ended up chucking in the rest of my pickled radishes :D

Coriander
Dried and sliced Coconut

serve with rice

Thursday, February 9

Quick and Easy Miso Ramen


I love Ramen soups...especially since my trip to Tokyo...but I always thought they would be really time consuming (which they definitely can be). Here's my quick cheat version of a Ramen and its so easy to make that I could eat it almost everyday. As you can see in the pics I've already had it a couple of times.


For the mushrooms and radishes:

0,5dl water
0,5dl Rice wine- or apple wine vinegar
0,5dl sugar
30g shitake

I like the contrast of flavours so I really like to add a bit of pickled veg to my soup. Normally I would choose Rice wine vinegar since it's used in Japanese cooking but I didn't have any this time at hand so I substituted it with apple wine vinegar. To pickle the Shiitakes just make a pickle mix with sugar, vinegar and water and let them pickle for a bit. I wanted the flavour to be more intense also so I drained them and cooked the mushrooms in just a bit of the pickle mix and let it cook down until the mushrooms had a bit of a sticky coating on them.

The rest of the pickled water mix that had been drained I used for the radishes but these I didn't cook cause I prefer them crunchy.


For the soup itself I used:

1 garlic clove
3 spring onions (20g)
15g ginger
5dl chicken stock or water...I've made with both and even with water its still really yummy since you will get all the flavour from the miso paste.
45g miso paste
1tbsp sesame oil
40-50g vegetables of your choice (for example haricot vert, soy beans, pak choi etc.)
In the first one I even had carrots as you can see in the pics...but I prefer without.
Salt (if needed)

boiled egg

soba noodles
chicken (one of the times I added the small pieces of chicken and let them cook in the stock, the other time I made sous vide chicken and added it on top)


1)Slice the Garlic into thin slices and sautée in a pot. Add the ginger and some of the spring onions. Add the stock or water and the sachets of miso paste. If your miso comes with seaweed then thats even better...just add it in.

2)Add the sesame oil...this will really change the flavour. Once the flavour is good just add the haricots or other veg (and chicken if you are cooking it in the soup).

3)Add the noodles. Once you're done just scoop the goodness into a bowl.

4)Add the pickled mushrooms and radishes and the rest of the spring onions for this I prefer the green parts.

5)Decorate with the halved boiled egg.
I even had some dried onions or Furikake (a mix with sesame seeds and seaweed) on top.
Even a drizzle of Sriracha (chili sauce) makes a difference.


You can make this of course with any meat of your preference or even eat it without. Also for the veg....just be creative, but honestly you don't need much! However, the pickled flavour makes a difference which I just really like.


Sunday, February 5

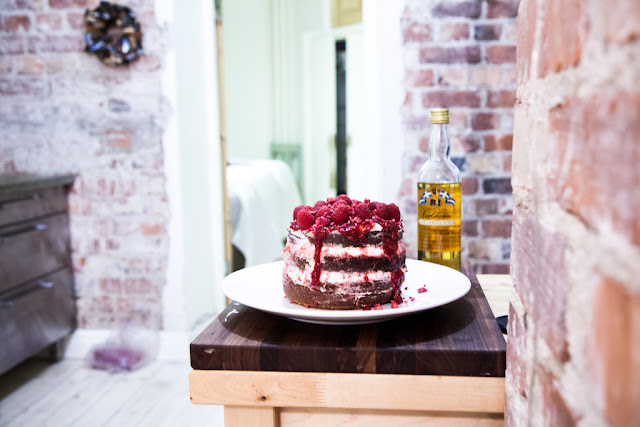
Runeberg's Torte


I just had my Birthday a few days ago 2nd of February yeeeyyy)  and was inspired by one of our seasonal pastries, Runebergin torttu, to make my Birthday cake with the same ingredients.

Runebergin torttu or Runeberg's Torte is named after our National poet Johan Ludvig Runeberg (1804-1877) who was famous for writing the lyrics to our national anthem. The torte was rumoured to have been created by his wife Fredrika and according to legends J.L. Runeberg enjoyed this torte for breakfast accompanied with a glass of Punsch. The torte is found in all the Finnish bakeries from January until the 5th of February which is Runeberg's birthday. The torte is normally the size of a cupcake and contains almonds and arrack or rum.
My version was a bit bigger. I made the cake with the same ingredients as traditionally found in the torte but filled it not only with raspberries but also mascarpone cream. I was missing maybe a bit of the bitter almond taste but will incorporate that to  the recipe next time.
The taste is not exactly the same as a Runeberg torte but it turned out to be a pretty yummy cake.


So here's the recipe of my Birthday cake!
Also Happy Birthday to Mr. Runeberg!


For the cake:

100g gingerbread cookies (I used Annas pepparkakor)
2 1/2dl almond flour
3 dl all purpose flour
2 tsp baking powder
1 1/2 tbsp cardamom
1 tbsp vanilla sugar
250g butter
1 1/2 dl sugar
1 1/2 dl brown sugar
4 eggs
2 dl cream

For moistening:
1 dl water
1 tbsp sugar
4 tbsp punsch

Mascarpone cream:
mascarpone 2dl
cream 2dl
sugar

Raspberry jam:
 2 bags (300g) Frozen raspberries
1 1/2 dl jam sugar

Heat the oven to 200° C
Crush the gingerbread cookies in a blender.
Mix together the gingerbread, flour, almond flour, baking powder, cardamom and vanilla sugar.
Beat the butter and sugar until light and a bit fluffy.
Add the eggs one by one while mixing.
Add the cream.
Mix in the dry ingredients until well incorporated.

Prepare 2 cakemolds 15cm in diameter.
pour in the batter equally into both.

Bake the cake in the oven for approximately 40 mins

Let the cakes cool down on a rack and cut of the dark and hard top. Cut them in half to create more layers.
Make the raspberry jam. I just heated some raspberries in a kettle and added some sugar used for making jams. I let it simmer until it thickens up just a bit. I prefer the taste of this to store bought raspberry jam.

Whip the cream and mascarpone and sweeten with just a bit of sugar.

Moisten every layer with the punch mixture and add raspberry jam and mascarpone cream. My cake ended up being really rustic and a bit messy...but it a was really moist and tasty. However, personally being a fan of the almond taste in the original Runeberg torte I was hoping I had had some almond extract or amaretto at home.